Build Log #7: Monetizing the Blog with Google AdSense
How Google AdSense works, the step-by-step application process, and how I used AI to optimize the blog for approval.
The blog is built. The domain is connected.
One thing remains. Monetization.
This post covers the entire process of connecting Google AdSense to the blog and starting to earn ad revenue.
What is Google AdSense?
Google AdSense is a service that places ads on your blog so you can earn money.
The concept is simple.
Advertisers want to promote their products and services. If they place ads where people visit, sales naturally increase. If my blog gets visitors, I'm essentially saying to Google:
"My blog has value for advertising. Place ads here and share the ad revenue with me."
Here's the full flow:
Advertiser pays Google → Google automatically places ads on my blog → Visitors see or click the ads → Google pays 68% of ad revenue to the blog owner
How Does Revenue Work?
Revenue is generated in two ways.
CPC (Cost Per Click) — Money is earned when a visitor clicks an ad. Each click typically ranges from a few cents to several dollars. Niches like finance, insurance, and tech tend to have higher click values, while general lifestyle content tends to be lower.
CPM (Cost Per Mille) — Money is earned when an ad is shown 1,000 times. Even without clicks, revenue is generated just from the ad being displayed.
Revenue Calculation Example
100 daily visitors × 2% click rate = 2 clicks 2 clicks × $0.40 per click = $0.80/day Monthly revenue = ~$24
Revenue scales proportionally with traffic. 1,000 daily visitors could mean $240/month. 10,000 visitors could mean $2,400/month.
Of course, this is a simplified calculation. Actual revenue depends on content topic, visitor location, ad placement, and many other factors.
Can Anyone Apply?
No. Google AdSense requires passing a review process.
Google evaluates whether your blog deserves to display ads. In simple terms, they check if you have quality content that provides value to visitors.
Requirements for Approval
| Requirement | Description |
|---|---|
| Custom domain | .com, .net, etc. (not a free subdomain) |
| HTTPS | SSL certificate must be active |
| 10+ quality articles | 1,000+ words of informational content recommended |
| Essential pages | About, Contact, Privacy Policy pages required |
| Clean site structure | Navigation, categories, mobile optimization |
| 3+ weeks of operation | Longer operation period is better |
My Blog's Current Status
| Requirement | Status |
|---|---|
| Custom domain (aicraftlog.com) | ✅ Done |
| HTTPS | ✅ Cloudflare auto-applied |
| 10+ quality articles | ⚠️ Currently 7 (need 3-4 more) |
| About page | ✅ Done |
| Contact page | ✅ Done |
| Privacy Policy page | ✅ Done |
| 3+ weeks of operation | ✅ Done |
Most requirements are met — just need a few more articles. But you can submit the application first and continue publishing while the review is in progress. In fact, posting new content during the review period sends a positive signal to Google.
Time to actually apply.
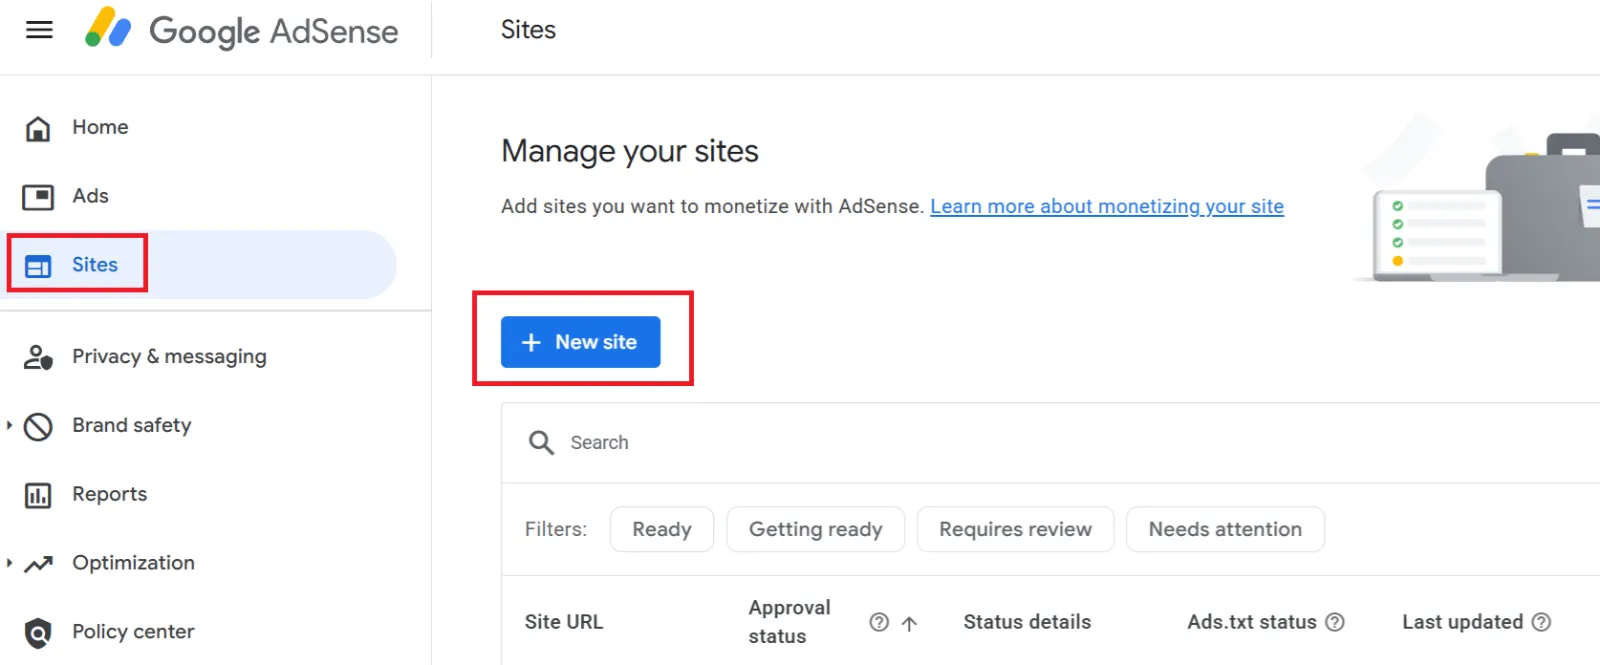
Applying for AdSense (Step by Step)
Step 1: Visit the AdSense Site
Go to https://adsense.google.com/start and click "Get started."
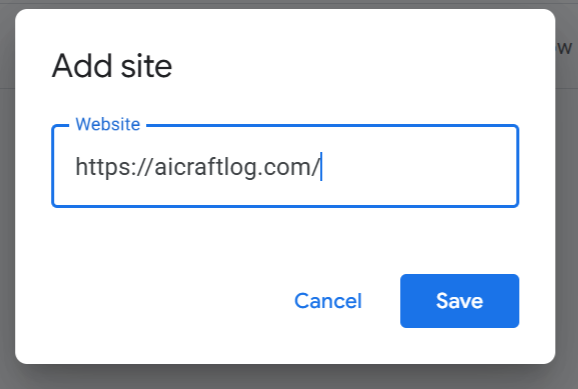
Step 2: Enter Your Site URL
Log in with your Google account and enter your blog address.
Step 3: Enter Personal Information
Enter your name, address, and phone number.
Two important warnings here.
First, phone verification is mandatory. Starting in 2025, applications won't be processed without completing personal information registration. If you skip phone verification, you may end up in an infinite waiting loop with no rejection email ever sent.
Second, enter your address accurately. Google sends a PIN number by physical mail after approval. If the address is wrong, you can't receive the PIN, and your earnings will be suspended.
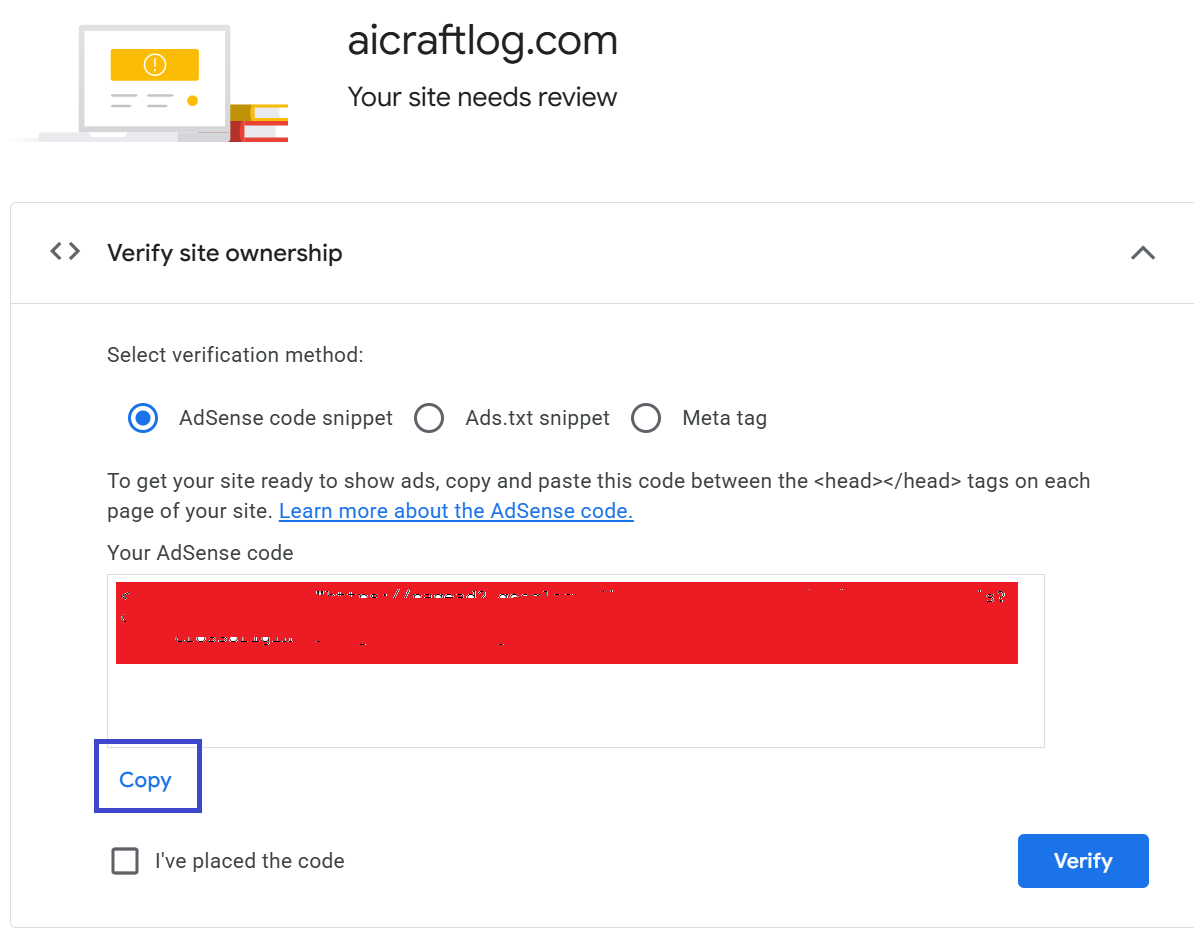
Step 4: Insert the AdSense Code
Google provides a code snippet that needs to go inside the <head> tag of your blog.
Copy this code, then ask Claude Code:
Insert the Google AdSense code into the <head> tag. Code: (paste the code provided by Google)
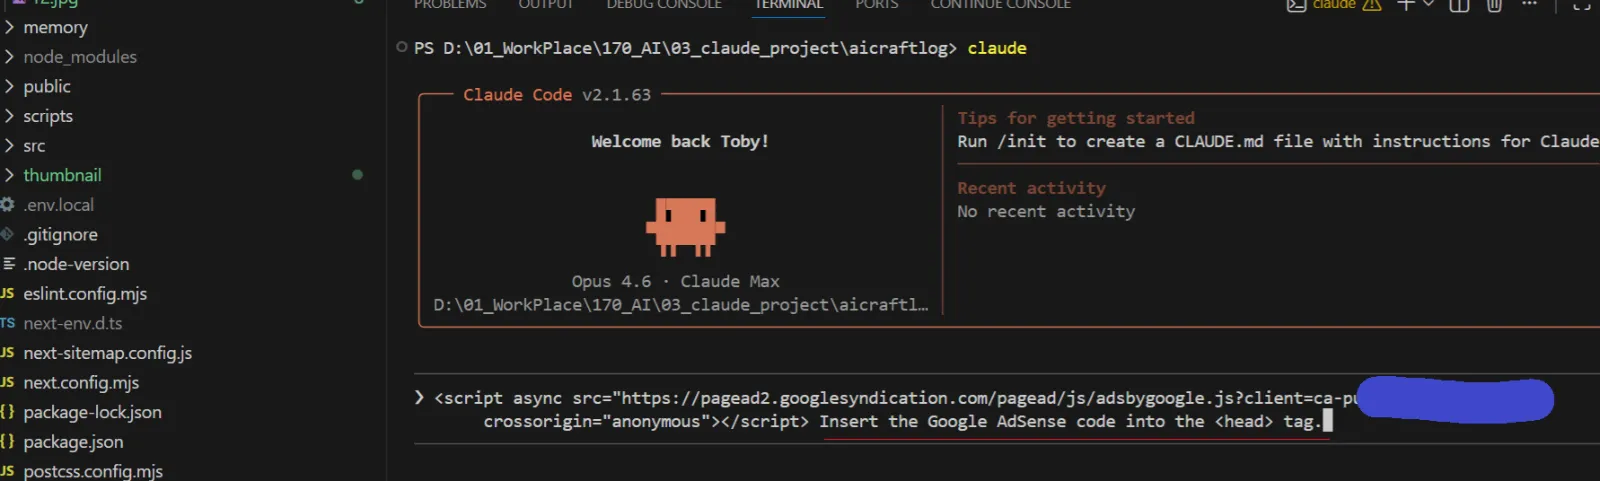
Once Claude Code inserts the code, deploy the changes:
git add . git commit -m "Add Google AdSense code" git push
Step 5: Verify Ownership
After deployment, click the "Verify" button on the AdSense screen.
Google checks your site for the AdSense code and confirms ownership.
Step 6: Wait for Review
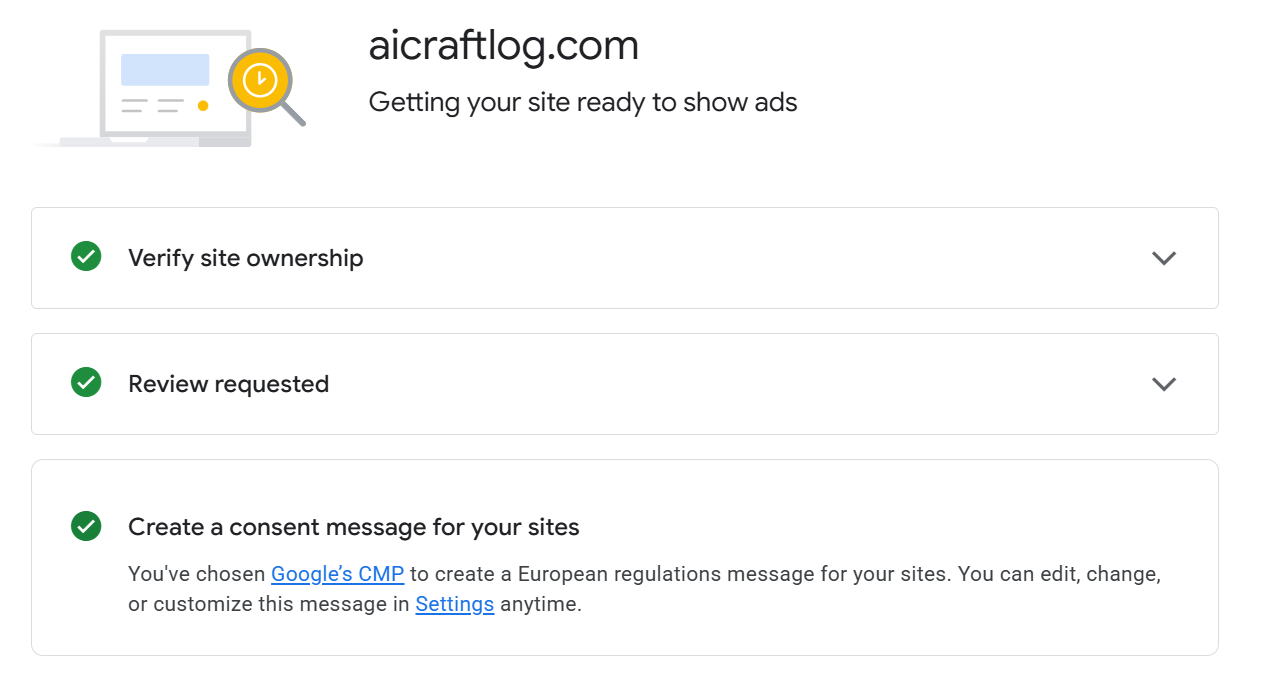
Review submission is complete!
The review typically takes a few days up to 2-4 weeks. Once approved, you'll receive an email notification, and ads will automatically start appearing on your blog.
Improving Your Approval Chances
Submitting the application isn't the end. You can further optimize your blog to increase approval chances.
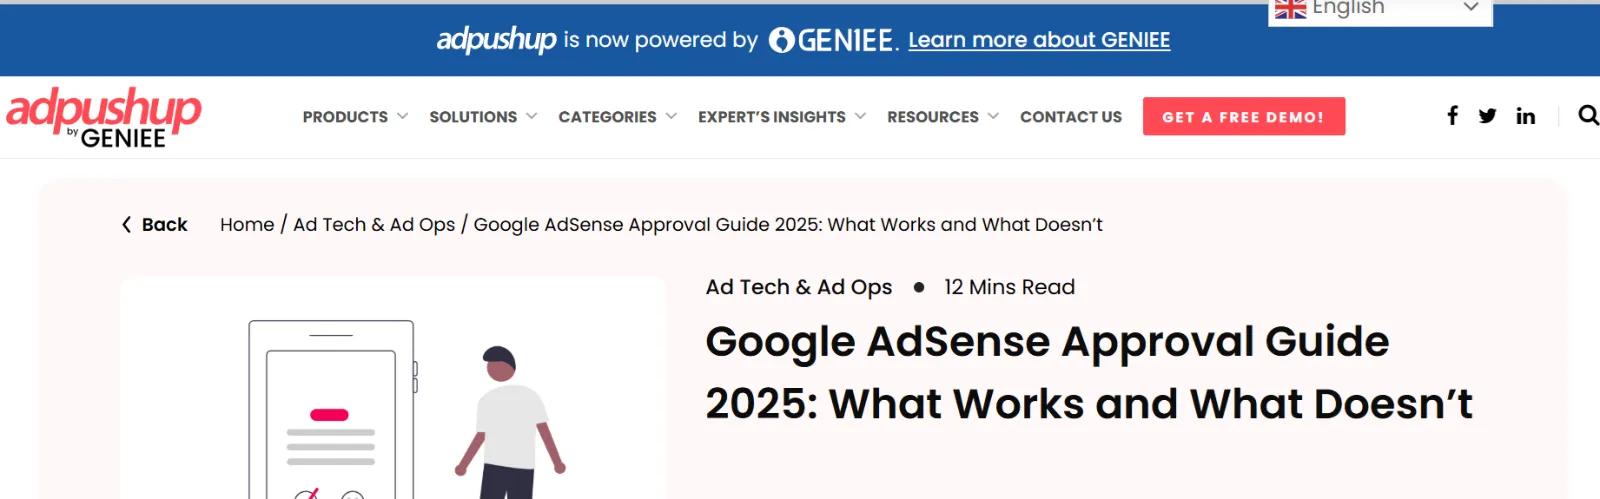
This guide has an excellent breakdown of AdSense approval requirements:
https://www.adpushup.com/blog/google-adsense-approval/
Let AI Handle It
Here's the key insight.
The guide contains dozens of requirements — site structure improvements, essential pages, SEO optimization, and more. You don't need to analyze and implement these one by one.
Copy the guide page and ask Claude Code:
Based on this information, please improve the blog to better meet Google AdSense approval requirements. (paste the guide content)

We're no longer in an era where humans manually analyze mountains of text requirements.
Hand it to AI, and just make the request. What matters now is how you command the AI.
What to Do While Waiting
Don't just sit around while waiting for the review. Use this time to strengthen your blog.
1. Keep writing — More content signals higher value to Google. Publishing new posts during the review sends a positive signal.
2. Register with Google Search Console — For Google to crawl your blog and show it in search results, you need to submit a sitemap to Search Console. I'll cover this in detail in the next post.
3. Never click your own ads — This violates AdSense policy. Clicking your own ads can result in permanent account suspension. Under no circumstances should you ever click your own ads.
Cost Breakdown (Updated)
With AdSense applied, here's the full cost of running this blog:
| Item | Cost | Notes |
|---|---|---|
| Claude Pro (AI coding) | $20/month | Code generation + blog improvements |
| Domain (.com) | ~$10/year | Purchased on Cloudflare |
| Cloudflare Pages (hosting) | Free | Build + deploy + HTTPS |
| GitHub (code storage) | Free | Public repository |
| Google AdSense | Free | No signup fee |
| Total | ~$21/month | Including domain |
Once ad revenue starts flowing, it can offset these costs and then some. Earnings become withdrawable once they reach $100.
Summary
Here's what we did in this post:
-
Understood AdSense revenue structure — Advertiser → Google → Blog owner (68% split)
-
Applied for AdSense — Account creation → Code insertion → Ownership verification → Waiting for review
-
Used AI to improve the blog — Fed the AdSense guide to Claude Code for automatic optimization
The core message is this:
AI handles analyzing requirements and modifying code. We just need to make the right request.
Coming Next
AdSense is submitted, but one thing remains.
When people search on Google, my blog needs to appear. No matter how great the content is, if it doesn't show up in search results, there are no visitors. No visitors means no revenue.
Next post: I'll explain how to use Google Search Console to get the blog indexed and visible in search results.
See you in Build Log #8.
I'm an embedded software developer building AI-powered web services with zero web experience. Follow the journey at aicraftlog.com.
Related Posts
Stay Updated
Get notified when I publish new posts. No spam, unsubscribe anytime.